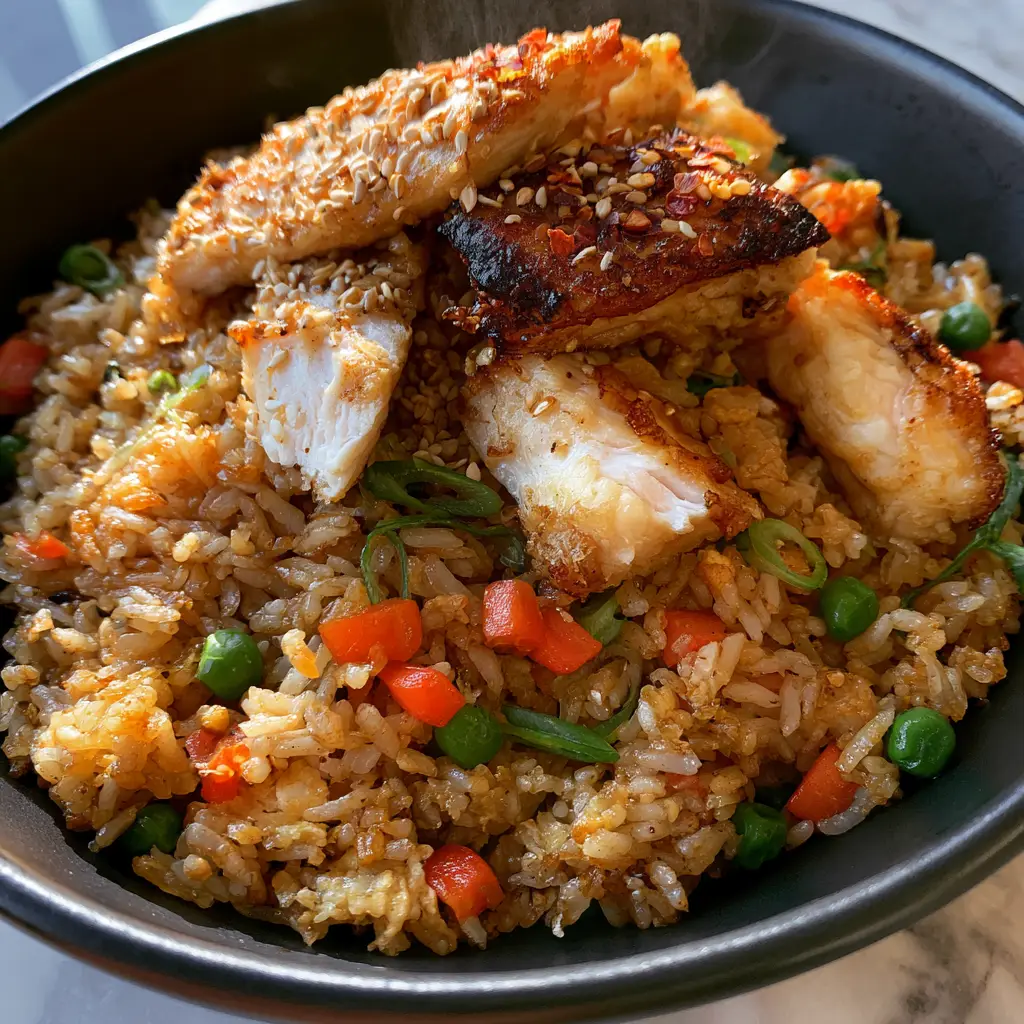
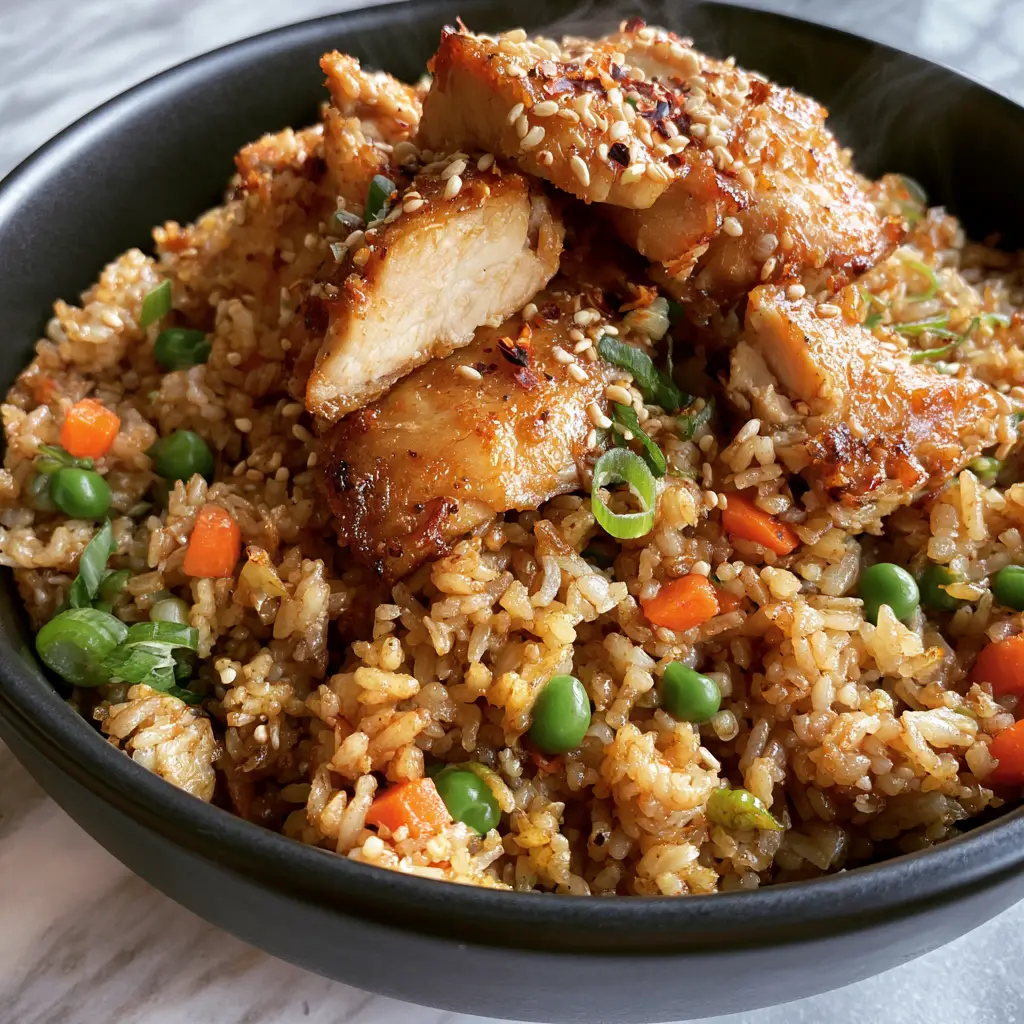
There is a specific, soul-satisfying magic that happens when high heat meets chilled rice and savory aromatics. Imagine a handheld smartphone photo of authentic Chicken Fried Rice served in a matte charcoal ceramic bowl, where every single grain is a distinct, golden-brown treasure. This isn’t your average takeout side dish; this is a masterclass in texture and flavor, designed for the home cook who craves that elusive “wok hei” or breath of the wok.
The visual appeal of this Chicken fried rice is undeniable, featuring large, chunky pieces of seared chicken breast with crispy golden edges piled high. You will see vibrant green peas and finely diced orange carrots punctuating the landscape of glistening rice. A light sheen of toasted sesame oil catches the soft, natural daylight, while a sprinkle of toasted white sesame seeds and red chili flakes adds the final touch of professional flair.
To achieve this result, we move beyond simple stir-frying into the realm of culinary forensics. We analyze the moisture content of the grain and the Maillard reaction on the poultry to ensure your final bowl matches the high-texture detail of professional food photography. Let’s dive into how you can recreate this masterpiece in your own kitchen.
The Anatomy of a Perfect Bowl: Why This Recipe Works
- Individual Grain Integrity: By using specific cooling techniques, we ensure zero mushiness and perfectly separated golden-brown grains.
- The Ultimate Sear: We focus on high-heat contact to create those charred edges on the chicken breast that provide a smoky, savory depth.
- Vibrant Visual Contrast: The combination of bright orange carrots and vibrant green peas ensures the dish looks as fresh as it tastes.
- Aromatic Finishing: Toasted sesame oil and dried red chili flakes provide a sensory experience that hits the nose before it hits the tongue.
Essential Ingredients for Gourmet Chicken Fried Rice
Long-Grain White Rice: 3 cups (600g) of cooked, day-old rice is the non-negotiable foundation. Fresh rice contains too much moisture, which leads to steaming rather than frying; chilled rice allows for those individual golden-brown grains.
Chicken Breast: 1 lb (454g) of boneless, skinless breast, cut into large chunky pieces. We want significant surface area for the sear to create those crispy golden edges described in our visual blueprint.
Aromatic Oil Base: 3 tbsp (45ml) of a high-smoke point neutral oil, like canola or grapeseed, is required for the initial sear. This allows the pan to get screaming hot without the oil breaking down or smoking excessively.
The Trinity of Color: 1/2 cup (75g) finely diced carrots and 1/2 cup (75g) vibrant green peas. These provide the essential pops of color and a natural sweetness that balances the salty soy components.
Toasted Sesame Oil: 1 tsp (5ml) used exclusively as a finishing oil. It provides that iconic light sheen and deep nutty aroma that defines authentic Chicken fried rice.
Seasoning and Spice: 3 tbsp (45ml) low-sodium soy sauce for color, 1 tsp (5g) toasted white sesame seeds, and 1/2 tsp (2g) dried red chili flakes for a gentle, warming heat.
Fresh Aromatics: 2 cloves of minced garlic and 1 tsp of grated ginger. These “invisible” ingredients are scientifically required to build the flavor profile that supports the seared chicken.
Professional Tools for the Home Chef
To achieve the high-texture detail seen in our charcoal bowl presentation, equipment choice matters. A heavy-bottomed carbon steel wok is ideal for heat distribution, but a large cast-iron skillet is a fantastic alternative for achieving that charred chicken crust. You will also need a wide, flat spatula (preferably metal) to toss the rice without crushing the grains, ensuring they remain individual and glistening.
The Master Blueprint: Step-by-Step Instructions
Step 1: Preparing the Foundation
Ensure your 3 cups (600g) of cooked rice has been refrigerated for at least 12 hours. Take the rice out and gently break up any large clumps with your hands. This physical separation is the first step toward the “zero mushiness” goal, allowing each grain to be coated in oil and soy sauce individually.
Step 2: Achieving the Perfect Chicken Sear
Pat your chicken breast chunks dry with a paper towel; moisture is the enemy of a good sear. Heat 1 tbsp (15ml) of neutral oil in your wok over high heat until it just begins to shimmer. Add the chicken in a single layer and leave it undisturbed for 2-3 minutes.
Listen for a vigorous sizzling sound—this is the moisture evaporating and the Maillard reaction beginning. Flip the pieces only when they naturally release from the pan, showing deep golden charred edges. Once seared on both sides but not fully cooked through, remove the chicken and set it aside to rest.
Step 3: Sautéing the Vibrant Aromatics
Add another tablespoon of oil to the pan. Toss in your finely diced orange carrots. Stir-fry for 2 minutes until they begin to soften but still retain a slight snap. Add the garlic and ginger, tossing for 30 seconds until the fragrance fills your kitchen. If you love variety in your rotation, this base is similar to what you might use in 30-minute vegetarian meals.
Step 4: The Golden Transformation of the Rice
Turn the heat to its maximum setting and add the remaining oil. Add the chilled rice to the center of the wok. Using your spatula, spread the rice out and press it slightly against the hot surface. Let it sit for 30 seconds to “toast” before tossing.
Drizzle the soy sauce over the rice and toss rapidly. You are looking for a visual change: the rice should transition from white to a beautiful, uniform golden-brown. Add the vibrant green peas and the seared chicken back into the pan, tossing until the peas are heated through and the chicken is fully cooked.
Step 5: The Finishing Touches and Plating
Remove the wok from the heat—this is crucial to preserve the delicate compounds in the sesame oil. Drizzle 1 tsp (5ml) of toasted sesame oil over the dish and give it one final toss. This creates that light sheen seen in our visual prompt.
Transfer the rice to a matte charcoal ceramic bowl. Top with a generous handful of thinly sliced fresh green scallions. Finish with a sprinkle of toasted white sesame seeds and a few dried red chili flakes for that professional, handheld photo-ready look.
Expert Tips for Success
- Dry Your Rice: If you must use fresh rice, spread it on a baking sheet and place it in front of a fan for 30 minutes to dehydrate the surface.
- Crowding is the Enemy: If your pan isn’t large enough, sear the chicken in batches. Crowding the pan drops the temperature and causes the chicken to boil in its own juices rather than sear.
- The “Wok Flip”: Constant movement is key once the rice is in the pan to ensure even coloring and to prevent sticking.
- Taste as You Go: Different soy sauce brands have varying salt levels. Start with 2 tablespoons and add the third only if the color and saltiness need a boost.
Storage, Reheating & Freezing Advice
This Chicken fried rice stores beautifully in an airtight container in the refrigerator for up to 3 days. To reheat, avoid the microwave if possible, as it can make the rice rubbery. Instead, add a teaspoon of water to a skillet and flash-fry the rice over medium-high heat until steaming. This dish also freezes well for up to a month; simply thaw overnight in the fridge before reheating.
What to Serve With This Dish
While this bowl is a complete meal on its own, it pairs wonderfully with refreshing sides. Consider a crisp cucumber onion and tomato salad to cut through the richness of the fried rice. If you are looking for a fusion feast, you might also enjoy serving this alongside Japanese BBQ chicken fried rice or even some Thai-style ground pork skewers. To wash it all down, a cold lemonade moscato wine spritzer provides a bright, citrusy contrast to the savory soy flavors.
Frequently Asked Questions
Absolutely. Simply swap the soy sauce for Tamari or coconut aminos. Ensure your other ingredients, like the chili flakes and sesame seeds, are processed in a gluten-free facility.
Yes! Chicken thighs have a higher fat content and are more forgiving under high heat, though chicken breast (as used in this recipe) provides those specific chunky, seared edges when prepared correctly.
The ‘smoky’ flavor comes from the Maillard reaction. Let your chicken and rice sit undisturbed on a very hot surface for 30-60 seconds to develop a slight char before tossing.
Use a neutral oil with a high smoke point, like canola, vegetable, or grapeseed oil for the frying. Toasted sesame oil should only be used at the very end as a finishing flavor agent.
Mushy rice is usually caused by using fresh, warm rice which has too much moisture. For individual golden grains, always use chilled, day-old rice that has had time to dry out in the fridge.
The Ultimate Chicken Fried Rice Recipe Card
Chicken Fried Rice with Crispy Seared Breast and Golden Individual Grains
Ingredients
Equipment
Method
- Take chilled rice and break up any clumps by hand to ensure individual grains.
- Pat chicken breast chunks dry with paper towels to ensure a crispy sear.
- Heat 1 tbsp oil in wok over high heat. Sear chicken until charred edges form, then remove.
- Add 1 tbsp oil, carrots, garlic, and ginger. Sauté until fragrant (approx. 2 mins).
- Add remaining oil and rice. Toss with soy sauce until golden-brown and glistening.
- Return chicken to pan with peas. Toss for 1-2 minutes until heated through.
- Remove from heat. Drizzle with sesame oil and top with scallions, sesame seeds, and chili flakes.
Notes
Ensure the wok is smoking hot before adding the chicken to get those crispy edges.
Closing & Call to Action
Mastering the art of Chicken fried rice is a journey of heat, timing, and high-quality ingredients. By following these steps, you’ve moved beyond a simple recipe and into the realm of professional culinary execution. We hope your kitchen is now filled with the incredible aroma of toasted sesame and seared chicken.
Did you achieve those perfect charred edges? We want to hear about it! Leave a comment below, and don’t forget to follow us on Pinterest for more visually-driven recipe inspiration. Share your photos of your charcoal bowl masterpieces and tag us!